Completely Finished Colette Coat!

When last I posted pictures of the Colette Coat, I only had to finish the sleeves and add some extra top-stitching to keep the front facings from curling. But while finishing up the sleeves my inner muse had other ideas.

I knew I needed some way to fasten the front so I picked up some copper/gold chain and matching hooks while at Jo-Ann Fabrics to string across from button to button (with hooks on opposite sides so it looks more balanced) and came up with this:
Front detail of the Colette Coat!

Back chain detail of the Colette Coat!
Once I finished the front closure I had a lot of chain left. So, I went through my jewelry making and embroidery supplies and found large gold coloured rings and gold tone beads. I've seen coats with buttons and chains across the backs as decoration but I didn't have any extra buttons that matched the ones already on there. So, I strung the chains on rings to fit across the side back seams and then attached the rings to the gold tone beads (this is because the thread is more likely to slip through the butted ends of the ring so sewing beads to the seams is better for long term wear) and sewed the beads into to the back side seams.
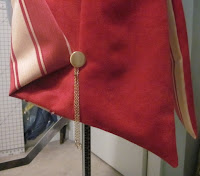
Chain tassel on the button of the Colette Coat!


When I finished that I still had some short lengths of chain left. So I divided them into two tassels, attached small gold rings on the end of each and attached them to the buttons on the tails.
Colette Coat sleeves!


Finally, I finished up the sleeves that my friend wanted to be reversable and cuffed. I only had limited fabric to use as we hadn't originally planned on making them so I got creative. The red side of the sleeve fit the standard sleeve pattern with no room for a cuff while the stripe side had 5 extra inches in length.

So, I cut them out and sewed them together (right sides together then turned with the sleeve cap top-stitched closed) and pressed the sleeves so when it is red fabric out the sleeves are full length with a striped cuff. With the striped fabric out, the sleeves are just below elbow length with a deep red cuff. Then I put two grommets in the top of the sleeve (matching the two that are hiding under the sleeve cap) and laced them together with red leather.

And the Colette Coat is now officially done! Once it's mailed to my friend who commissioned it, I'll post pictures of her entire outfit as the Ringmaster Colette Nagin from the Cirque de la Vapeur.

The Tree of Gondor Coat Planning!


Simplicity 3628, Threads Collection
I have finally started working on the Tree of Gondor coat that I have been thinking about for 4 years. My goal is to make a practical fall/spring coat that is appropriate to wear out and about while proudly displaying my inner geek. Also, I wanted to use up some of the fabric in my stash (which has grown distressingly while I was at school).

My first job was to pick out an appropriate jacket pattern. I had been eyeing Simplicity 3628 from the Threads Collection as the reviews for it were good and I liked the psuedo military style and top-stitch detail of view C (the red one in the middle). Then there was a $1.99 Simplicity pattern sale at Jo-Ann Fabrics, so I picked it up in my size.

Tree of Gondor design from Faramir and
Aragorn. Courtesy of Nicole Kipar,
 from alleycatscratch.com
The next step was figuring out how to best incorporate the Tree of Gondor into the design. My original vision was having the white tree design on the back based off the City of Osgiliath flag which had the white tree and seven stars but without the crown. I also wanted to have some scroll work or Celtic knot designs on the sleeves, collar or hem. But I've pretty much decided against that as I think it would look too much like a costume. Instead, I'm just going to do the top-stitiching on the collar and sleeves for the jacket in white/cream to tie in the design on the back.

Then I had to pick out the fabric. I knew I wanted to make the coat either blue or green with white/cream detail. And in my stash I found I had a bunch of dark sage green microsuede material left over from my Irish dress which would work perfectly as it was mid-weight, smooth and doesn't fray easily. And, while I was at my local Jo-Ann fabrics I found a remnant of white/cream velour just the right size for the tree on the back. It was also the right pile height to work as the microsuede was very flat and I wanted the Tree to not only stand out visually but also in texture. My plan for making the Tree is flat-lining the back panel of the jacket with the velour (right side to wrong side), sewing around the edge of the design in almost a satin stitch on my Bernina and then very, very carefully cutting out the inside of the design to reveal the white/cream velour.

And now it's finally time to make a mock up of the jacket and test the design technique for the Tree. Pictures and a new post to come when I finish that!

And here's the first post of my Tree of Gondor Coat Construction!