Tree of Gondor Coat Construction: Part 1

Now that I had a pattern (Simplicity 3628, view C) and fabric (a sage-forest green micro-suede for the fashion fabric and dark brown cotton twill for the lining) I needed to make a mock up of the pattern.
My dressform.

First, I adjusted my dress-form to my measurements (a bra with socks for padding, and a slip). I also tied cords at the bust, waist and hip so I could check that the bust points and waistline matched the pattern.

Then I cut out and constructed a muslin mock up of the Simplicity coat pattern C according to their directions to what I thought was my size.

Amazingly, I only had to make a few changes to the pattern. I took in a bit underneath the arms at the side seams and tapered in the princess seams front and back to add more waist definition (there's an 8 inch different between my waist and bust, and 10 inch difference between my waist and hip).

Front of the mock up
Back of the mock up

Next, I scaled up the Tree of Gondor design to a width less than the measurement between the back two princess seams, printed it out, taped it together, and tried to figure out the exact placement.

Tree design pinned to the back of the mock up.

Once I figured out the exact scale and placement of the tree design I took the mock up apart, began to cut out the pieces of the coat from the micro-suede, and work on the back panel.

Next is Part 2, applique the tree design!

Mini-tutorial on how to do reverse applique

Apologies for not updating about the progress of my Tree of Gondor jacket! While I finish writing up the rest of the process, here's a mini tutorial of how to use reverse applique to create the tree design.

Here are the five basic steps:

First - Trace the design you want on the fashion fabric of the coat (the exterior layer). I tried to use a chalk pencil but, because of the micro-suede, I ended up using pen. My advice is to avoid using permanent methods of marking the fabric (like pen) in case the design changes, but it worked for me as I had a very set design and was using a narrow zig-zag that covered the pen marks.

Second - Pin and baste the backing to the interfaced exterior fabric and make sure the grain-lines match up, otherwise it'd be an awful stretched mess. I did a several lines of vertical and horizontal basting several inches apart.
Bernina Open Embroidery Foot (#20)

Third - Test the zig-zag (or other stitch you're going to use) on the same layered fabric, just to be sure all the settings are right before you start on the real thing. Also, I used a new universal needle (90/14, I think) and the Bernina open embroidery foot (#20) which let me see where I was stitching. However you have to be super careful not to pull on the fabric to suddenly in any direction as it greatly increases chances of breaking the needle. Another option would be the clear applique foot (#23) which I considered using but when I did a test I couldn't see my lines clearly enough.

Fourth - Spend forever slowly stitching over the design you just traced. It takes a lot of time, but precision at this stage is very important. If you have a design with pointy bits (like root tips and star points), it really helps to set the sewing machinet to the "needle ends down" setting and use a knee bar to lift the presser foot. This allowed me to manipulate the fabric so I could get the points as sharp and clean as possible on the ends of the tree branches and stars.

Fifth - Use the smallest point scissors you have (I bought Gingher Epaulette mini snips just for this project which worked beautifully) and cut out the inside of the design. Then you trim and trim and keep trimming until all the little stray threads are gone.

This was my test piece for the reverse applique process. 

Now, onto constructing the coat!

Sewing Machine Review: Bernina 380

As the 1 year anniversary of getting my own sewing machine approaches, I want to write a review for the Bernina 380 to help any others who are making up their minds about buying one.

The Bernina 380

First, a bit of background about my experiences with sewing machines. I've been sewing since I was very young, mostly by hand but when I did start to use a machine in high school it was my mom's Bernina Activa 130. In college, I used my roommates vintage Singer (from the 60's), a basic modern Singer, a miniature travel machine, the mechanical Bernina 1008.

When deciding on a sewing machine, I went and tested out a bunch of them by bringing scraps of my usual fabrics in all thicknesses and layers and I also asked about sales, as there was no way I wanted to pay full price for any machine when I could wait for a sale. Here's the reasoning why I picked the machine I did:


Why a Bernina:
  • If you sew regularly (at least an hour a week), you need the reliability of a machine with solid metal insides, which many modern machines don't have. Also, in my case, I make some money off of commissions and the knowledge that my machine will last for years and years with heavy use is awesome.
  • Quality of stitches - compared to many modern inexpensive machines, the stitches are always consistent even at high speeds.
  • The warranty - Extremely generous! (2 year warranty on electrical, 5 year warranty on boards, 20 year warranty on parts). All you have to do is make sure it's serviced by a certified Bernina technician.
  • Free classes - Even though I have been sewing for years, taken classes, and worked in a costume shop, the woman who taught the free class that came with my machine was extremely knowledgeable and taught me specific tips and techniques to use for the machine.
  • Free 1 year checkup - A $100 value!
  • Free help! - At the GStreet I bought my machine at, the Bernina specialist is happy to answer questions on the phone or in person at the store. She even helped me troubleshoot a problem I was having my first month.
  • Left handed machine- I am left handed and Berninas still have the presser foot lever is on the left hand side of the machine. Many of the modern machines and other companies try to move it closer to the center/right side, which is awkward for me to use.
  • Many different feet options - I have the choice of over 70 different feet, including the awesome ruffler and hemmer foot.

In the end, certain features really sold me on the Bernina 300 line (although I really considered the 200 line and the 1008). The entire 300 line:
  • Small sized machines - As a recent graduate with only an internship, I had no idea where I was going next, so a smaller, portable machine appealed to me.
  • The stitches and monograms - I really liked the mechanical 1008, but I knew the ability for decorative stitches and monograms would be useful for hobby sewing, even if not my usual clothing/costume commissions.
  • Extra features - The higher end of the 200 line was no longer available in my area (except used) and if I was going to pay that much, I wanted to have the full warranty.
  • Within my price limit - All of these machines ranged from $700-1400, not on sale. And there was an excellent sale going on at GStreet for these machines.
  • Autopilot! (as a friend of mine calls it) - these machines sew by themselves in straight lines with minimal guidance and with a speed adjusting slide. This means I can sew decorative stitches with no worry about consistency.

What sold me on the 380:
  • The free hand system - While I was skeptical in the store of why I'd need it, it was invaluable while working on the Tree of Gondor coat and I'm sure will be on many other projects.
  • Top of the line - My dad recommended I get the highest grade machine I could afford so that I could grow into it over many years. He's usually right about these sorts of things.
  • Tonnes of stitches - 20 practical stitches, 12 patchwork stitches, 4 buttonholes, 79 decorative stitches, 2 alphabets. It's pretty neat.
  • Luggage quality carrier - A really nice padded, rolling case that fits the machine and all my accessories. Another plus for a travelling student.
  • Lots of feet - The 380 came with most of the feet I wanted, besides specialty feet like the ruffler and hemmer.
  • Geared for general sewing - Unlike the 350 Patchwork Edition, which had many features geared towards quilters, the 380 had more features/stitches geared towards general sewing.


Review of Performance:

As a seamstress/costumer, the Bernina 380 is almost perfect for me. It's a smaller machine, but as a travelling student I don't need a large complicated one that does embroidery right now. Also, the smaller throat on the machine hasn't been a problem. It can power through many layers of thick fabric (corsets and heavy upholstery) and it also sews thin fabrics well (such as sheers and light cotton) with just some tension adjustments. One of the criticisms I read about the 300 series is there is no physical adjustment for presser foot pressure but it seems to adjust well on its own and I've had no problems with it so far. However, I don't really quilt though fiddly layers and I don't usually work with extremely thin fabrics, so I don't know about how it would work with those consistently. Also, on average I sew 3 hours a week but if I have a costuming deadline or commission, I have been known to sew over 10 hours a week. And my sewing machine works just the same as it did when I first bought it.


So, if you're in the same situation as I am: a travelling student who needs a reliable, all purpose machine, then a Bernina 380 is an excellent choice.

Scarlet Pimpernel/Highwayman Cloak

Sir Percy-
The Scarlet Pimpernel
Ever since I first read the book, I have loved the Scarlet Pimpernel. And when I finally saw the 1980's movie (the one with Anthony Andrews, Jane Seymore and Ian Mckellan) I wanted to make a stylized version of the outfit he wears through much of the movie - fitted breeches, flounce shirt, cravat, striped waistcoat and a large billowy cloak.

So, over the past few years, I've been slowly acquiring all the things I'd need to make the outfit when I see them cheaply: the gold plated lion's head buttons (12 for $6 from a yarn shop closing sale), raw black silk for breeches (free as the fabric has a small glue stain in one corner), and striped gold satin for the waistcoat ($1 for an odd shaped 2 yard piece from an upholstery store).

But the cloak always gave me some trouble, just with the sheer volume of fabric needed (more than 8 yards when made to hit the floor at my height and make it extra billowy). I ended up being given about 10 yards of black cotton/wool blend (most likely a type of linsey-woolsey, but of unknown origin) for helping clean up an SCA lady's house.
Simplicity 5794

So, I used one of my favourite patterns, Simplicity 5794 (View A), which I have used to make 2 wool cloak commissions previously and always ends up nice. I left the body unlined (as both sides of the fabric look the same) and lined the hood in remnants of black satin. I finished all the inside seams with a zig-zag stitch on my machine and all the outside edges and hems were sewn with a rolled hem foot which ended up giving it a lettuce edge look which I really like and made the cloak drape beautifully.


The fabric itself was easy to sew but left a mess. It shed and I had to clean my Bernina after every hour or so because it would leave behind such a mess of lint. However, the fabric made the cloak super warm! I wore it to the MD Renaissance Faire in October and I was nice and toasty the entire time.

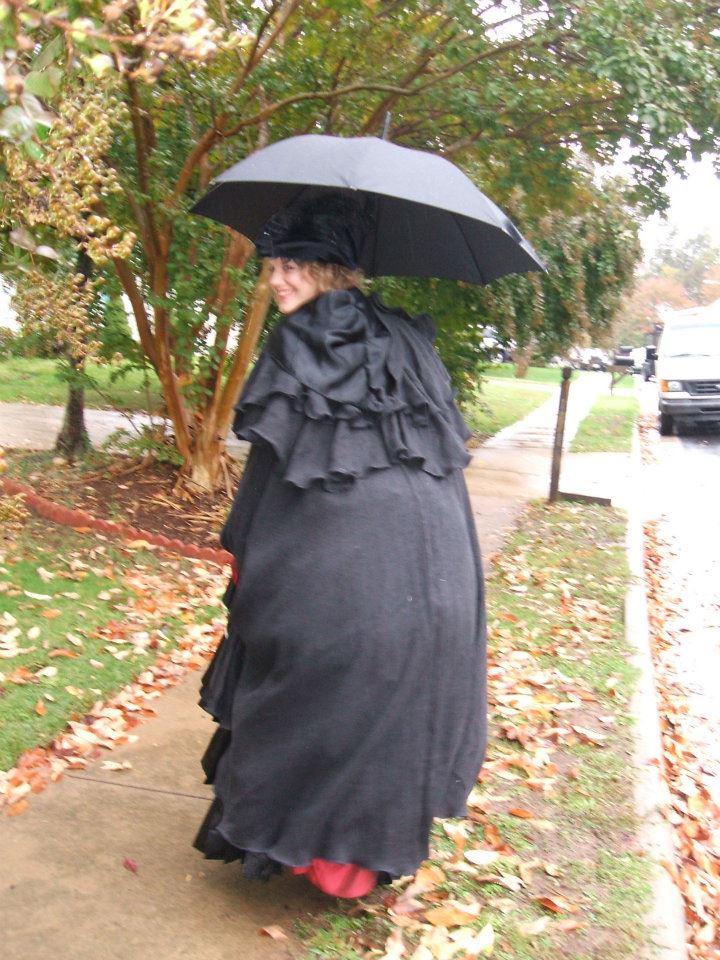
Here are some picture of the cloak in action!
 
Back view. Picture taken before Halloween while
wearing a bustle dress in high winds and rain!
Side view at the Maryland
Renaissance Festival

One Hour Slops Mini-tutorial

Recently, I found myself invited to a local SCA event and I needed a pair of pants to go with my blue doublet (as my trunkhose and hose needed some repairs and I needed pants by the next day).

So I needed a pair that I could make in one night, from material I had in my stash and in a relatively period style to go with my simple doublet. So I decided on slops (also called Venetians, and are a type of loose breeches that fall just below the knee) to go with the middle class look.
Simplicity 3677
I had a bit more than a yard of black lynsey-woolsey fabric (technically it was cotton and wool, but woven the same way) from making my highwayman's cloak and Simplicity pattern 3677 for the lady pirate breeches (Pants style  H). I just added 10-15 inches in the middle of the leg pattern piece (the pattern is made with only has one pattern piece per leg) then gathered the lower leg into a fitted cuff and turned over the top into a casing where I ran a super long shoe lace through to tie it.
 
Waghenaer's Mariner's Mirror, 1586.
 Engraved frontispiece by Theodor de Bry.


The end result was a very comfortable pair of loose breeches that only took an hour to make which looked pretty good tucked into my knee high leather pirate boots (and looked like the slops in the engraving to the right).

After that the event was over when I finally had some spare time, I took off the waistband and added 6 darts around the waist to fit it closer to my hips. I placed the darts with one over each hip then two on the front and back (a third of the way in from my hip on each side). Each dart was only about 2 inches deep and 3-4 inches long, still giving them the full leg look.


So there you go, an easy way to make pants in a hurry before an SCA event!

Completely Finished Colette Coat!

When last I posted pictures of the Colette Coat, I only had to finish the sleeves and add some extra top-stitching to keep the front facings from curling. But while finishing up the sleeves my inner muse had other ideas.

I knew I needed some way to fasten the front so I picked up some copper/gold chain and matching hooks while at Jo-Ann Fabrics to string across from button to button (with hooks on opposite sides so it looks more balanced) and came up with this:
Front detail of the Colette Coat!

Back chain detail of the Colette Coat!
Once I finished the front closure I had a lot of chain left. So, I went through my jewelry making and embroidery supplies and found large gold coloured rings and gold tone beads. I've seen coats with buttons and chains across the backs as decoration but I didn't have any extra buttons that matched the ones already on there. So, I strung the chains on rings to fit across the side back seams and then attached the rings to the gold tone beads (this is because the thread is more likely to slip through the butted ends of the ring so sewing beads to the seams is better for long term wear) and sewed the beads into to the back side seams.
Chain tassel on the button of the Colette Coat!


When I finished that I still had some short lengths of chain left. So I divided them into two tassels, attached small gold rings on the end of each and attached them to the buttons on the tails.
Colette Coat sleeves!


Finally, I finished up the sleeves that my friend wanted to be reversable and cuffed. I only had limited fabric to use as we hadn't originally planned on making them so I got creative. The red side of the sleeve fit the standard sleeve pattern with no room for a cuff while the stripe side had 5 extra inches in length.

So, I cut them out and sewed them together (right sides together then turned with the sleeve cap top-stitched closed) and pressed the sleeves so when it is red fabric out the sleeves are full length with a striped cuff. With the striped fabric out, the sleeves are just below elbow length with a deep red cuff. Then I put two grommets in the top of the sleeve (matching the two that are hiding under the sleeve cap) and laced them together with red leather.

And the Colette Coat is now officially done! Once it's mailed to my friend who commissioned it, I'll post pictures of her entire outfit as the Ringmaster Colette Nagin from the Cirque de la Vapeur.

The Tree of Gondor Coat Planning!


Simplicity 3628, Threads Collection
I have finally started working on the Tree of Gondor coat that I have been thinking about for 4 years. My goal is to make a practical fall/spring coat that is appropriate to wear out and about while proudly displaying my inner geek. Also, I wanted to use up some of the fabric in my stash (which has grown distressingly while I was at school).

My first job was to pick out an appropriate jacket pattern. I had been eyeing Simplicity 3628 from the Threads Collection as the reviews for it were good and I liked the psuedo military style and top-stitch detail of view C (the red one in the middle). Then there was a $1.99 Simplicity pattern sale at Jo-Ann Fabrics, so I picked it up in my size.

Tree of Gondor design from Faramir and
Aragorn. Courtesy of Nicole Kipar,
 from alleycatscratch.com
The next step was figuring out how to best incorporate the Tree of Gondor into the design. My original vision was having the white tree design on the back based off the City of Osgiliath flag which had the white tree and seven stars but without the crown. I also wanted to have some scroll work or Celtic knot designs on the sleeves, collar or hem. But I've pretty much decided against that as I think it would look too much like a costume. Instead, I'm just going to do the top-stitiching on the collar and sleeves for the jacket in white/cream to tie in the design on the back.

Then I had to pick out the fabric. I knew I wanted to make the coat either blue or green with white/cream detail. And in my stash I found I had a bunch of dark sage green microsuede material left over from my Irish dress which would work perfectly as it was mid-weight, smooth and doesn't fray easily. And, while I was at my local Jo-Ann fabrics I found a remnant of white/cream velour just the right size for the tree on the back. It was also the right pile height to work as the microsuede was very flat and I wanted the Tree to not only stand out visually but also in texture. My plan for making the Tree is flat-lining the back panel of the jacket with the velour (right side to wrong side), sewing around the edge of the design in almost a satin stitch on my Bernina and then very, very carefully cutting out the inside of the design to reveal the white/cream velour.

And now it's finally time to make a mock up of the jacket and test the design technique for the Tree. Pictures and a new post to come when I finish that!

And here's the first post of my Tree of Gondor Coat Construction!