Tree of Gondor Coat Construction: Part 2

Once I finished cutting the coat shell pieces from the micro-suede, I finally got to work on the the back panel.

Test of the reverse applique technique.
I cut out the tree from the paper pattern and traced it onto the back piece with pen, carefully lining up the center back mark on the design and fabric. Then, I cut a cream velour piece a little larger than the suede to layer beneath it and basted them together on my sewing machine. I had already done a test of the stitch setting on the fabrics and tried different feet and techniques, so I was prepared to dive into the real thing.


Here are the pictures I took pictures through the process:

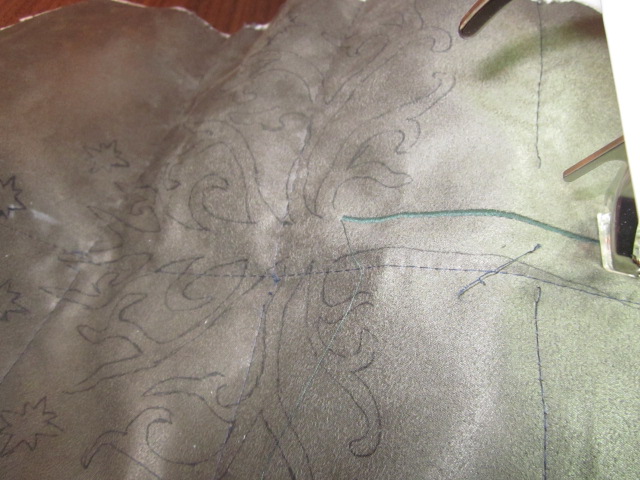
Before the first stitch.
You can see the design marked out in pen. I actually used the Bernina open embroidery foot (#20), not the clear applique foot (#23) that's on the machine in this picture. Also note the basting stitches holding the layers of fabric together.

Almost to the tree roots.
You can see where I cut the basting after sewing over it to make sure it wasn't stuck underneath the narrow zig-zag stitch.

Almost done!
On the branches and stars, the knee-lift and 'needle-down' function were invaluable to getting sharp points. I also started cutting out some large parts of reverse applique to make sure the cream fabric looked OK. 

Next in Part 3, onto trimming out the center of the applique design!

Tree of Gondor Coat Construction: Part 1

Now that I had a pattern (Simplicity 3628, view C) and fabric (a sage-forest green micro-suede for the fashion fabric and dark brown cotton twill for the lining) I needed to make a mock up of the pattern.
My dressform.

First, I adjusted my dress-form to my measurements (a bra with socks for padding, and a slip). I also tied cords at the bust, waist and hip so I could check that the bust points and waistline matched the pattern.

Then I cut out and constructed a muslin mock up of the Simplicity coat pattern C according to their directions to what I thought was my size.

Amazingly, I only had to make a few changes to the pattern. I took in a bit underneath the arms at the side seams and tapered in the princess seams front and back to add more waist definition (there's an 8 inch different between my waist and bust, and 10 inch difference between my waist and hip).

Front of the mock up
Back of the mock up

Next, I scaled up the Tree of Gondor design to a width less than the measurement between the back two princess seams, printed it out, taped it together, and tried to figure out the exact placement.

Tree design pinned to the back of the mock up.

Once I figured out the exact scale and placement of the tree design I took the mock up apart, began to cut out the pieces of the coat from the micro-suede, and work on the back panel.

Next is Part 2, applique the tree design!

Mini-tutorial on how to do reverse applique

Apologies for not updating about the progress of my Tree of Gondor jacket! While I finish writing up the rest of the process, here's a mini tutorial of how to use reverse applique to create the tree design.

Here are the five basic steps:

First - Trace the design you want on the fashion fabric of the coat (the exterior layer). I tried to use a chalk pencil but, because of the micro-suede, I ended up using pen. My advice is to avoid using permanent methods of marking the fabric (like pen) in case the design changes, but it worked for me as I had a very set design and was using a narrow zig-zag that covered the pen marks.

Second - Pin and baste the backing to the interfaced exterior fabric and make sure the grain-lines match up, otherwise it'd be an awful stretched mess. I did a several lines of vertical and horizontal basting several inches apart.
Bernina Open Embroidery Foot (#20)

Third - Test the zig-zag (or other stitch you're going to use) on the same layered fabric, just to be sure all the settings are right before you start on the real thing. Also, I used a new universal needle (90/14, I think) and the Bernina open embroidery foot (#20) which let me see where I was stitching. However you have to be super careful not to pull on the fabric to suddenly in any direction as it greatly increases chances of breaking the needle. Another option would be the clear applique foot (#23) which I considered using but when I did a test I couldn't see my lines clearly enough.

Fourth - Spend forever slowly stitching over the design you just traced. It takes a lot of time, but precision at this stage is very important. If you have a design with pointy bits (like root tips and star points), it really helps to set the sewing machinet to the "needle ends down" setting and use a knee bar to lift the presser foot. This allowed me to manipulate the fabric so I could get the points as sharp and clean as possible on the ends of the tree branches and stars.

Fifth - Use the smallest point scissors you have (I bought Gingher Epaulette mini snips just for this project which worked beautifully) and cut out the inside of the design. Then you trim and trim and keep trimming until all the little stray threads are gone.

This was my test piece for the reverse applique process. 

Now, onto constructing the coat!