Scarlet Pimpernel/Highwayman Cloak

Sir Percy-
The Scarlet Pimpernel
Ever since I first read the book, I have loved the Scarlet Pimpernel. And when I finally saw the 1980's movie (the one with Anthony Andrews, Jane Seymore and Ian Mckellan) I wanted to make a stylized version of the outfit he wears through much of the movie - fitted breeches, flounce shirt, cravat, striped waistcoat and a large billowy cloak.

So, over the past few years, I've been slowly acquiring all the things I'd need to make the outfit when I see them cheaply: the gold plated lion's head buttons (12 for $6 from a yarn shop closing sale), raw black silk for breeches (free as the fabric has a small glue stain in one corner), and striped gold satin for the waistcoat ($1 for an odd shaped 2 yard piece from an upholstery store).

But the cloak always gave me some trouble, just with the sheer volume of fabric needed (more than 8 yards when made to hit the floor at my height and make it extra billowy). I ended up being given about 10 yards of black cotton/wool blend (most likely a type of linsey-woolsey, but of unknown origin) for helping clean up an SCA lady's house.
Simplicity 5794

So, I used one of my favourite patterns, Simplicity 5794 (View A), which I have used to make 2 wool cloak commissions previously and always ends up nice. I left the body unlined (as both sides of the fabric look the same) and lined the hood in remnants of black satin. I finished all the inside seams with a zig-zag stitch on my machine and all the outside edges and hems were sewn with a rolled hem foot which ended up giving it a lettuce edge look which I really like and made the cloak drape beautifully.


The fabric itself was easy to sew but left a mess. It shed and I had to clean my Bernina after every hour or so because it would leave behind such a mess of lint. However, the fabric made the cloak super warm! I wore it to the MD Renaissance Faire in October and I was nice and toasty the entire time.

Here are some picture of the cloak in action!
 
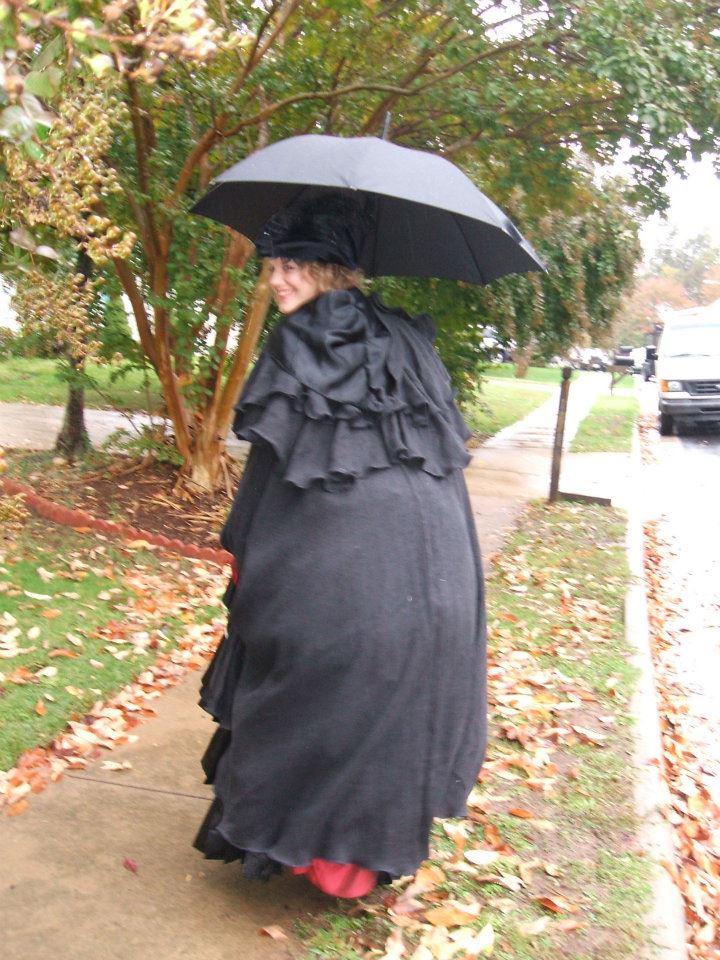
Back view. Picture taken before Halloween while
wearing a bustle dress in high winds and rain!
Side view at the Maryland
Renaissance Festival

One Hour Slops Mini-tutorial

Recently, I found myself invited to a local SCA event and I needed a pair of pants to go with my blue doublet (as my trunkhose and hose needed some repairs and I needed pants by the next day).

So I needed a pair that I could make in one night, from material I had in my stash and in a relatively period style to go with my simple doublet. So I decided on slops (also called Venetians, and are a type of loose breeches that fall just below the knee) to go with the middle class look.
Simplicity 3677
I had a bit more than a yard of black lynsey-woolsey fabric (technically it was cotton and wool, but woven the same way) from making my highwayman's cloak and Simplicity pattern 3677 for the lady pirate breeches (Pants style  H). I just added 10-15 inches in the middle of the leg pattern piece (the pattern is made with only has one pattern piece per leg) then gathered the lower leg into a fitted cuff and turned over the top into a casing where I ran a super long shoe lace through to tie it.
 
Waghenaer's Mariner's Mirror, 1586.
 Engraved frontispiece by Theodor de Bry.


The end result was a very comfortable pair of loose breeches that only took an hour to make which looked pretty good tucked into my knee high leather pirate boots (and looked like the slops in the engraving to the right).

After that the event was over when I finally had some spare time, I took off the waistband and added 6 darts around the waist to fit it closer to my hips. I placed the darts with one over each hip then two on the front and back (a third of the way in from my hip on each side). Each dart was only about 2 inches deep and 3-4 inches long, still giving them the full leg look.


So there you go, an easy way to make pants in a hurry before an SCA event!

Completely Finished Colette Coat!

When last I posted pictures of the Colette Coat, I only had to finish the sleeves and add some extra top-stitching to keep the front facings from curling. But while finishing up the sleeves my inner muse had other ideas.

I knew I needed some way to fasten the front so I picked up some copper/gold chain and matching hooks while at Jo-Ann Fabrics to string across from button to button (with hooks on opposite sides so it looks more balanced) and came up with this:
Front detail of the Colette Coat!

Back chain detail of the Colette Coat!
Once I finished the front closure I had a lot of chain left. So, I went through my jewelry making and embroidery supplies and found large gold coloured rings and gold tone beads. I've seen coats with buttons and chains across the backs as decoration but I didn't have any extra buttons that matched the ones already on there. So, I strung the chains on rings to fit across the side back seams and then attached the rings to the gold tone beads (this is because the thread is more likely to slip through the butted ends of the ring so sewing beads to the seams is better for long term wear) and sewed the beads into to the back side seams.
Chain tassel on the button of the Colette Coat!


When I finished that I still had some short lengths of chain left. So I divided them into two tassels, attached small gold rings on the end of each and attached them to the buttons on the tails.
Colette Coat sleeves!


Finally, I finished up the sleeves that my friend wanted to be reversable and cuffed. I only had limited fabric to use as we hadn't originally planned on making them so I got creative. The red side of the sleeve fit the standard sleeve pattern with no room for a cuff while the stripe side had 5 extra inches in length.

So, I cut them out and sewed them together (right sides together then turned with the sleeve cap top-stitched closed) and pressed the sleeves so when it is red fabric out the sleeves are full length with a striped cuff. With the striped fabric out, the sleeves are just below elbow length with a deep red cuff. Then I put two grommets in the top of the sleeve (matching the two that are hiding under the sleeve cap) and laced them together with red leather.

And the Colette Coat is now officially done! Once it's mailed to my friend who commissioned it, I'll post pictures of her entire outfit as the Ringmaster Colette Nagin from the Cirque de la Vapeur.

The Tree of Gondor Coat Planning!


Simplicity 3628, Threads Collection
I have finally started working on the Tree of Gondor coat that I have been thinking about for 4 years. My goal is to make a practical fall/spring coat that is appropriate to wear out and about while proudly displaying my inner geek. Also, I wanted to use up some of the fabric in my stash (which has grown distressingly while I was at school).

My first job was to pick out an appropriate jacket pattern. I had been eyeing Simplicity 3628 from the Threads Collection as the reviews for it were good and I liked the psuedo military style and top-stitch detail of view C (the red one in the middle). Then there was a $1.99 Simplicity pattern sale at Jo-Ann Fabrics, so I picked it up in my size.

Tree of Gondor design from Faramir and
Aragorn. Courtesy of Nicole Kipar,
 from alleycatscratch.com
The next step was figuring out how to best incorporate the Tree of Gondor into the design. My original vision was having the white tree design on the back based off the City of Osgiliath flag which had the white tree and seven stars but without the crown. I also wanted to have some scroll work or Celtic knot designs on the sleeves, collar or hem. But I've pretty much decided against that as I think it would look too much like a costume. Instead, I'm just going to do the top-stitiching on the collar and sleeves for the jacket in white/cream to tie in the design on the back.

Then I had to pick out the fabric. I knew I wanted to make the coat either blue or green with white/cream detail. And in my stash I found I had a bunch of dark sage green microsuede material left over from my Irish dress which would work perfectly as it was mid-weight, smooth and doesn't fray easily. And, while I was at my local Jo-Ann fabrics I found a remnant of white/cream velour just the right size for the tree on the back. It was also the right pile height to work as the microsuede was very flat and I wanted the Tree to not only stand out visually but also in texture. My plan for making the Tree is flat-lining the back panel of the jacket with the velour (right side to wrong side), sewing around the edge of the design in almost a satin stitch on my Bernina and then very, very carefully cutting out the inside of the design to reveal the white/cream velour.

And now it's finally time to make a mock up of the jacket and test the design technique for the Tree. Pictures and a new post to come when I finish that!

And here's the first post of my Tree of Gondor Coat Construction!

Real Life interferes with Sewing

I realize that I haven't posted anything in a very, very long time (since I was frantically getting everything made for Victorian Ball in January) mostly due to Real Life (namely school, work, graduating and trying to find a real job, etc). But! I have still been sewing constantly, as usual. :)

In January, I finished my 1880's ball gown which consisted of:
  • Collapsible bustle cage
  • a bustle petticoat
  • bloomers
  • chemise
  • a black taffeta underskirt
  • a 3 part bustle
  • and re-fitting my velvet bodice from the previous year's ball
Pictures of most of the pieces my outfit are posted in Deviant Art account here: http://silver2007dragon.deviantart.com/

And here's the entire outfit!


The Ball this year was amazing and almost everyone was in costume this year! I lead the Bustle Ladies and the Cirque Cast (http://cirquedevapeur.blogspot.com/), who were joined by Oscar Wilde and a Steampunk 10th Doctor and the rest of the Fencers en mass. Pictures of the entire group can be found here (http://www.flickr.com/photos/modernselkie/sets/72157625883550702/) taken by the wonderful photographer Modern Selkie who braved the 20 degree weather and standing in the road while dodging cars to take them.

In February and March I worked on a doublet and trunkhose set for Elizabethan Feast. I planned to match my boyfriend, who was dressing in a dove grey velvet outfit inspired by the Duke of Buckingham from the 1970's Three Musketeers and Four Musketeers. My outfit was made of an odd shaped piece of blue and gold diamond patterned brocade and there was just enough to make a sleeveless doublet and the slashes on my trunkhose made of gold taffeta. I also attempted to make hose to go underneath them, but the pattern I picked didn't fit as well as I hoped and there wasn't enough time to remake them before the Feast. An old blue velvet wrap skirt of mine got taken apart and turned into a sword cape to match the entire thing. Unfortunately, no really good pictures of my outfit were taken during Feast (probably due to the fact that I sprained one of my ankles twice during the dancing and had to leave early to get first aid) but my roomie got one before that mess with her iphone while I sang the annual rendition of "The Mermaid".

 In April and May, I finally started working on Colette's Ringmaster tailcoat from the Cirque de la Vapur. I'll go into detail about the process of pattern drafting and such in a later post, but here's a picture of the almost completed coat (it just needs a bit more top stitching and the matching sleeves).


It's my goal to start updating more regularly (hopefully with more tutorials, research and pattern drafting adventures!) but, as always, Real Life comes first. Cheers and happy sewing!